Sometimes finding a bike route can be as hard as biking up a hill. Our new bike overlay for Walkabout shows the way, and is enabled by fantastic bike data in OpenStreetMap and Tangram’s shader magic. If you’ve ever edited cycleway tags in OpenStreetMap, this map is dedicated to you. 🚲
( This map is interactive! Open full screen ➹ )
As usual, you can enable the bike overlay in just a few lines!
In preparation for the new bike overlay, we’ve also made some other improvements to Walkabout, particularly on roads, which we’ll go over in more detail below.
But first, let’s review how we’re presenting the data in the new bike overlay. Cycle data gets very complex very quickly, and after lots of sketching, we decided it would be best to organize the data according to safety. What is the safest route? Do I have to ride with cars? Which side of the road can I ride on?
These are some of the questions we asked when we created these categories and in the design process of the new bike overlay. Let’s review these categories below.
Where to Bike
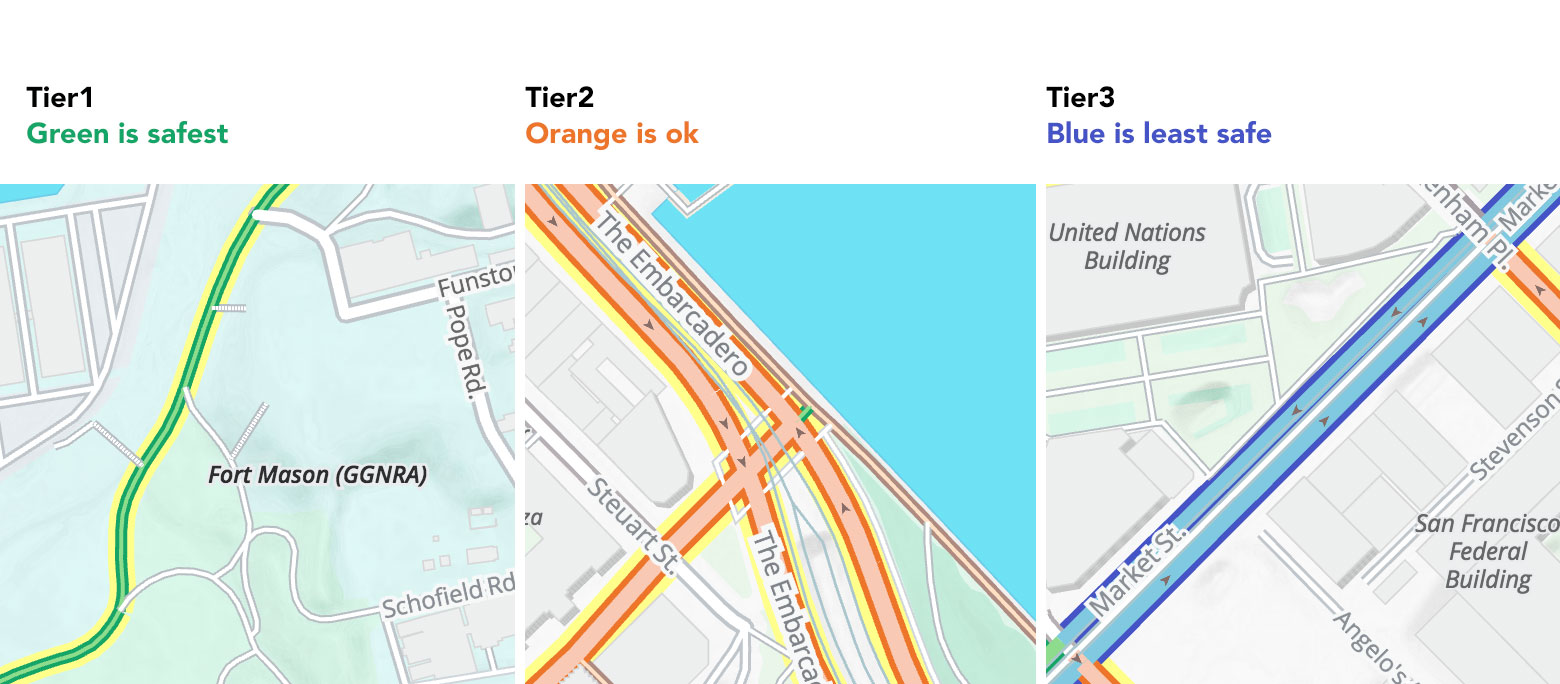
Roads and paths have been categorized into three tiers based on safety.
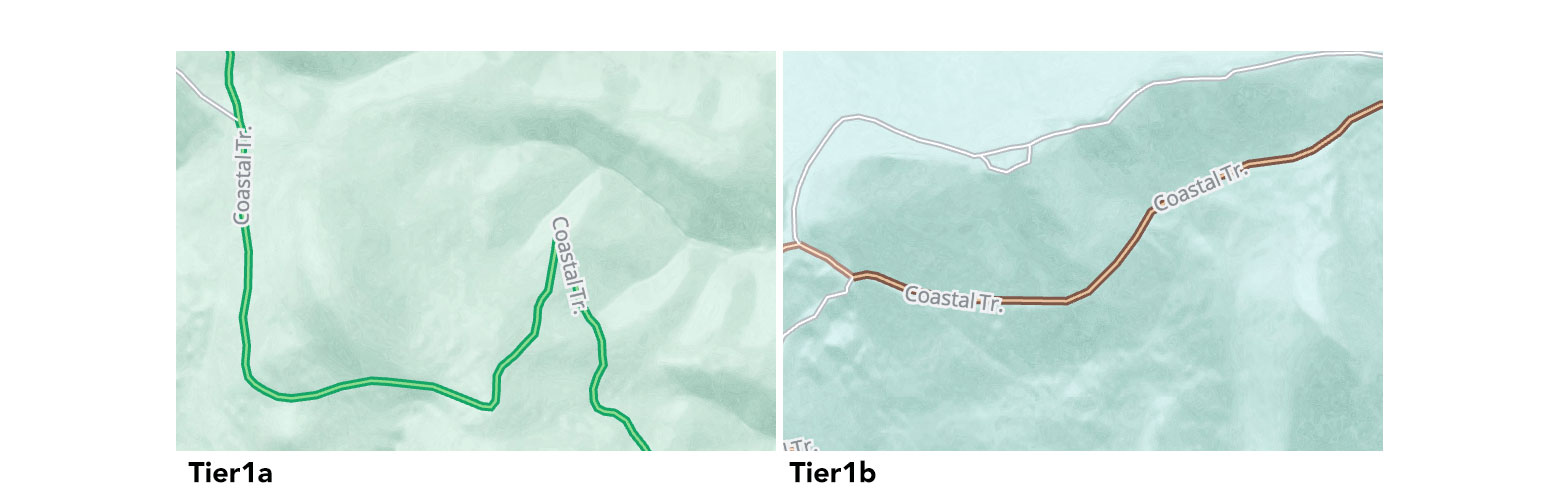
Tier 1 is further divided into 2:
- Tier 1a off-road paths in GREEN (no cars)
- Tier 1b off-road dirt track in BROWN (no cars)
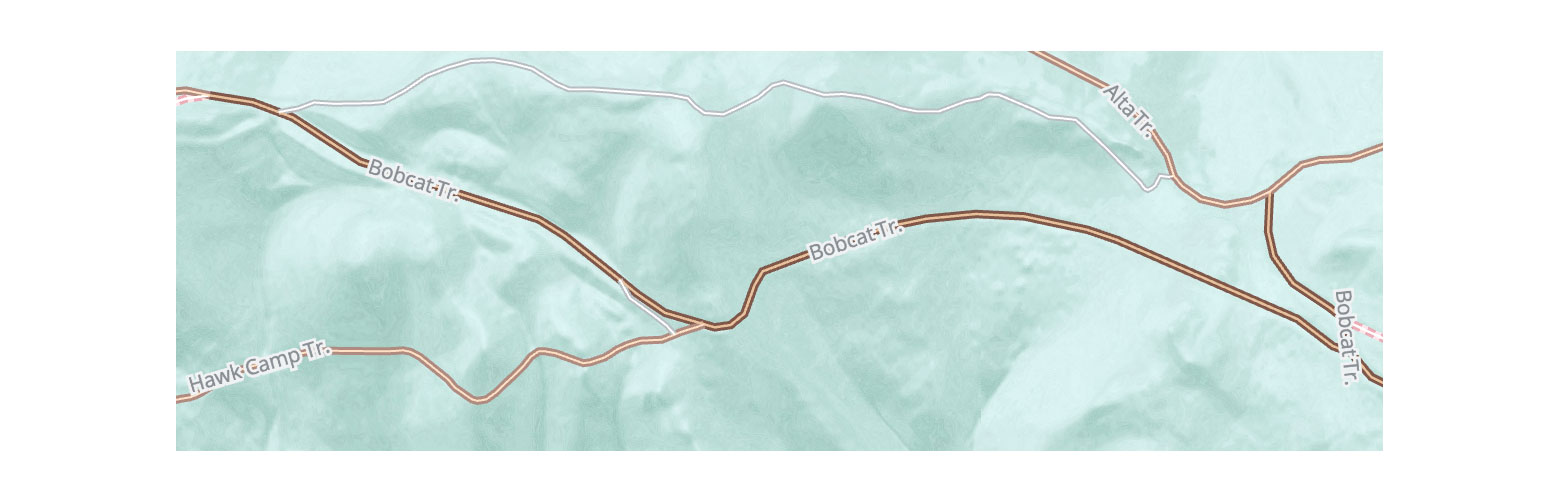
Tracks also include footways which are displayed in a lighter shade of brown, like Hawk Camp Trail and Alta Trail as footways compared to Bobcat Trail as a track.
Tier 2 - ORANGE
- on-road painted lanes (ride your bike next to cars)
Tier 3 - BLUE
- on-road “route” signage (ride your bike with cars)
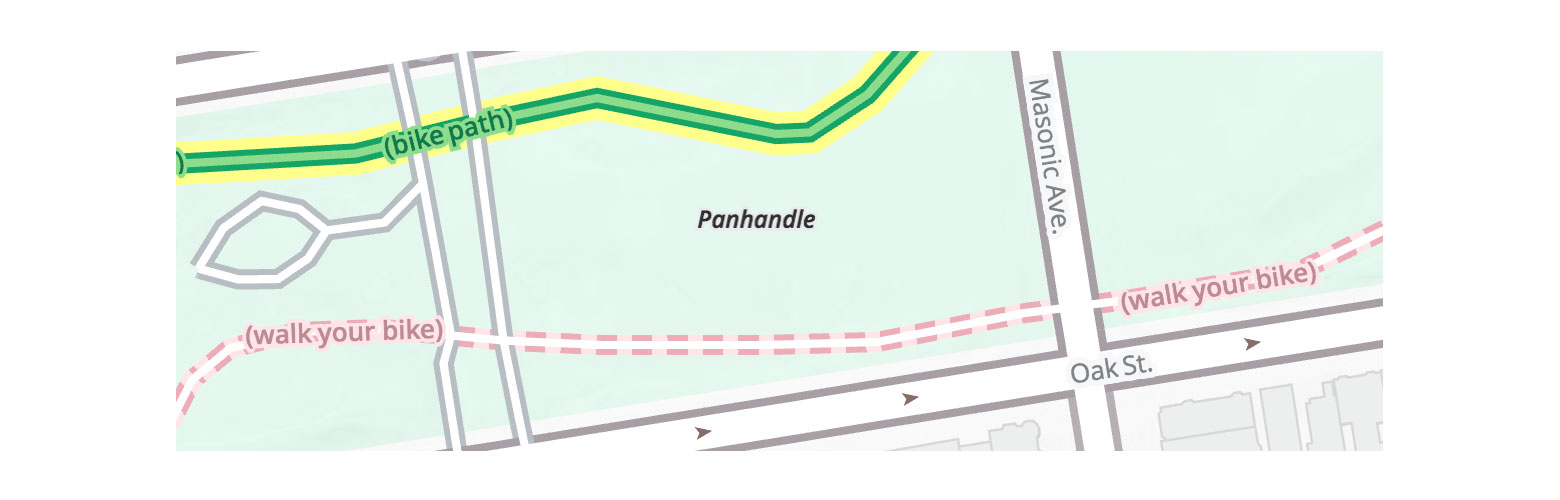
And there is a fourth tier, Tier 4 for bicycle=no or “walk your bike” in pink dashed lines.
Roads without any bicycle facilities are drawn in white with grey casing. If a road has bike facilities in real life (or bikes are prohibited) but that information is missing on the map, learn how to tag the roads in OpenStreetMap in the Powered By Mapzen Vector Tiles section below.
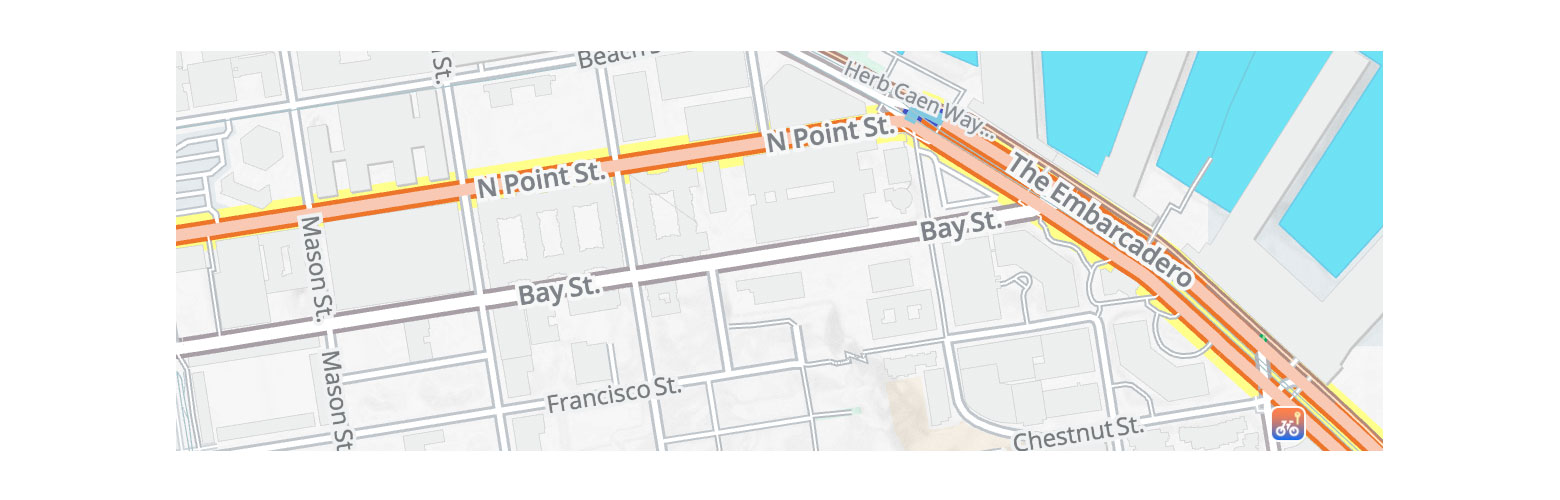
Bike Networks
A yellow highlight is added to roads when they are part of a bike network. For example, there’s a popular San Francisco bike network called the Wiggle (shown below) that minimizes hills 🎥 while also connecting popular biking routes.
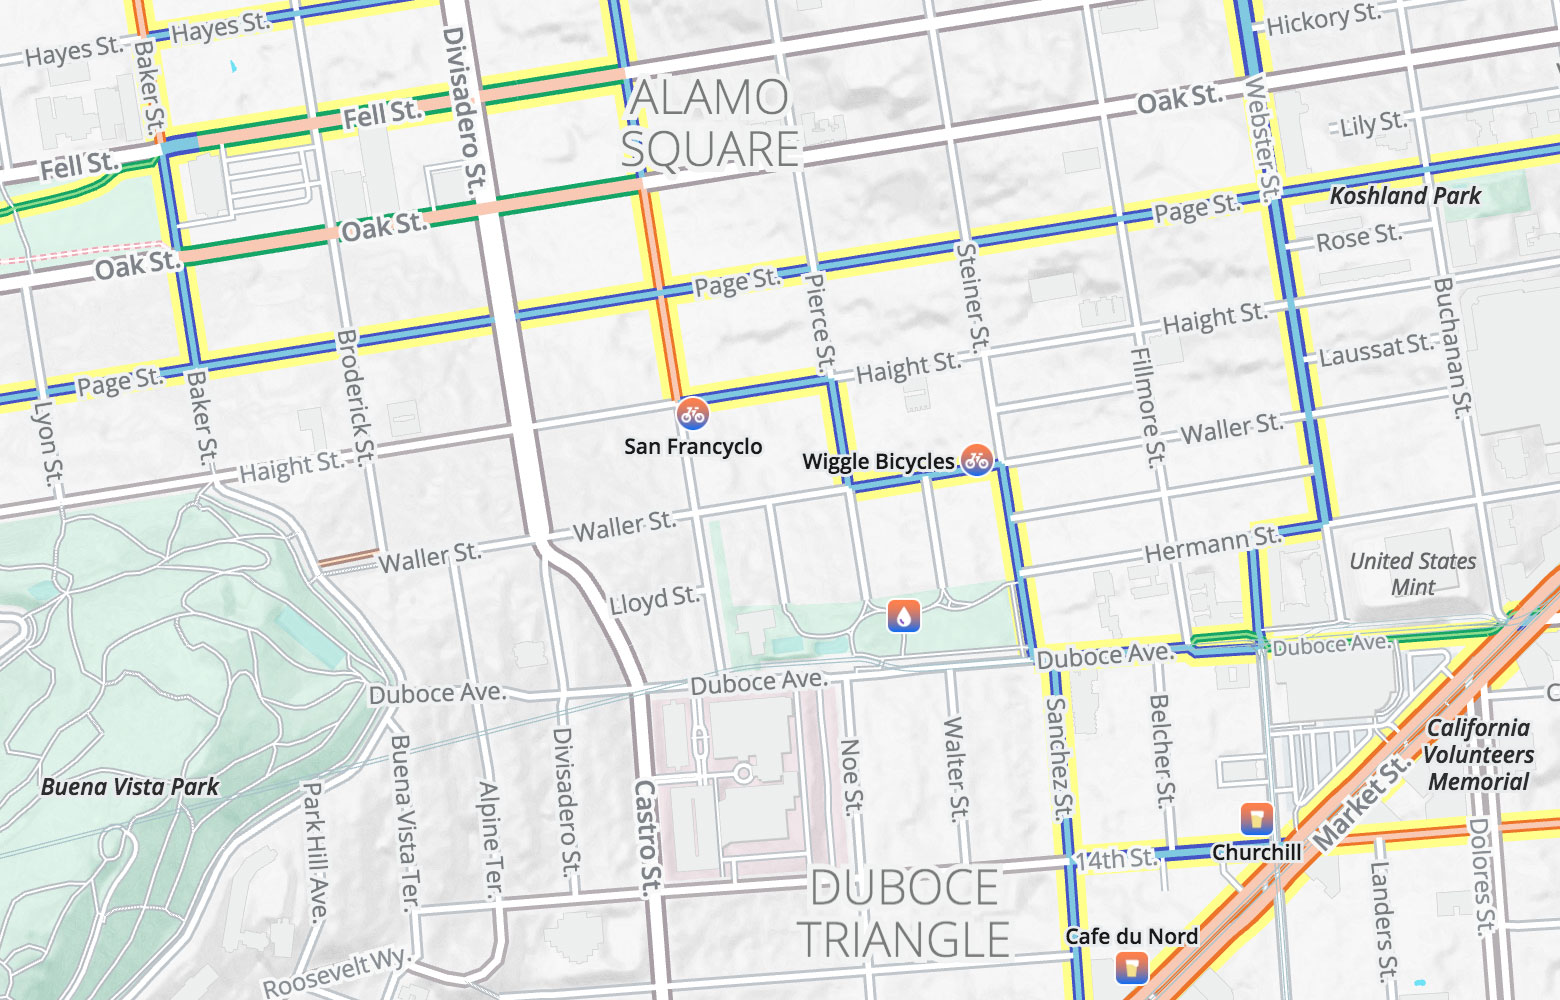
Bicycle networks are visible from low zoom levels. Networks include international, national, regional and local routes sourced from OpenStreetMap relations bicycle_network: icn, ncn, rcn, lcn.
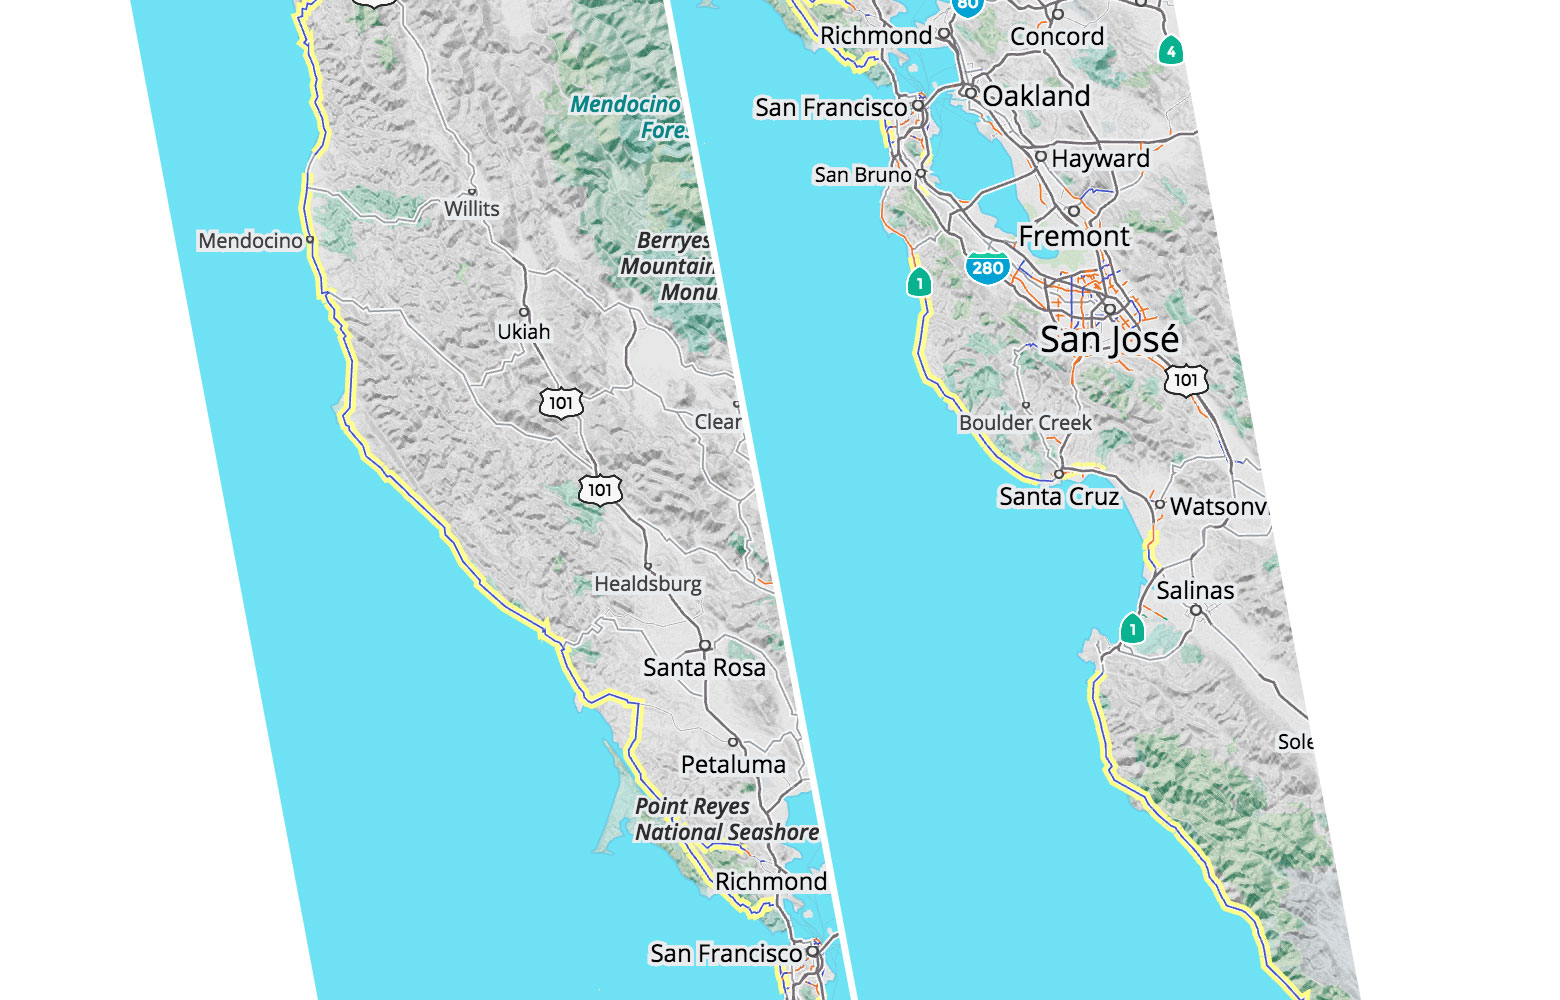
Pacific Coast Bicycle Route in northern California, at zoom 8.
Bike Labels
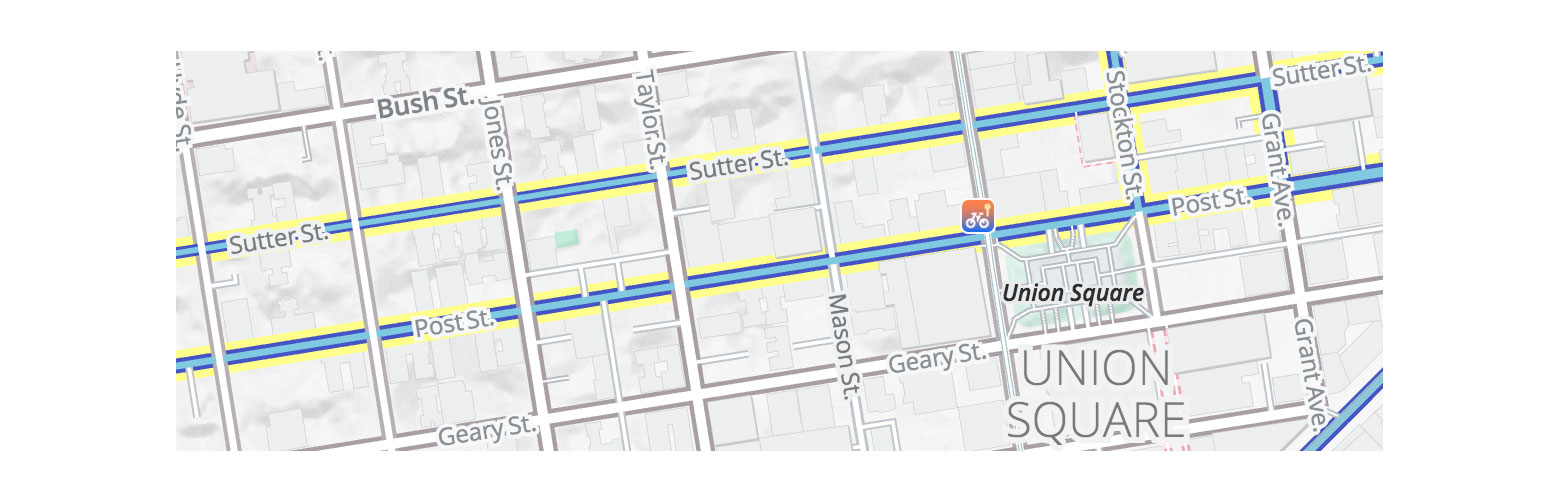
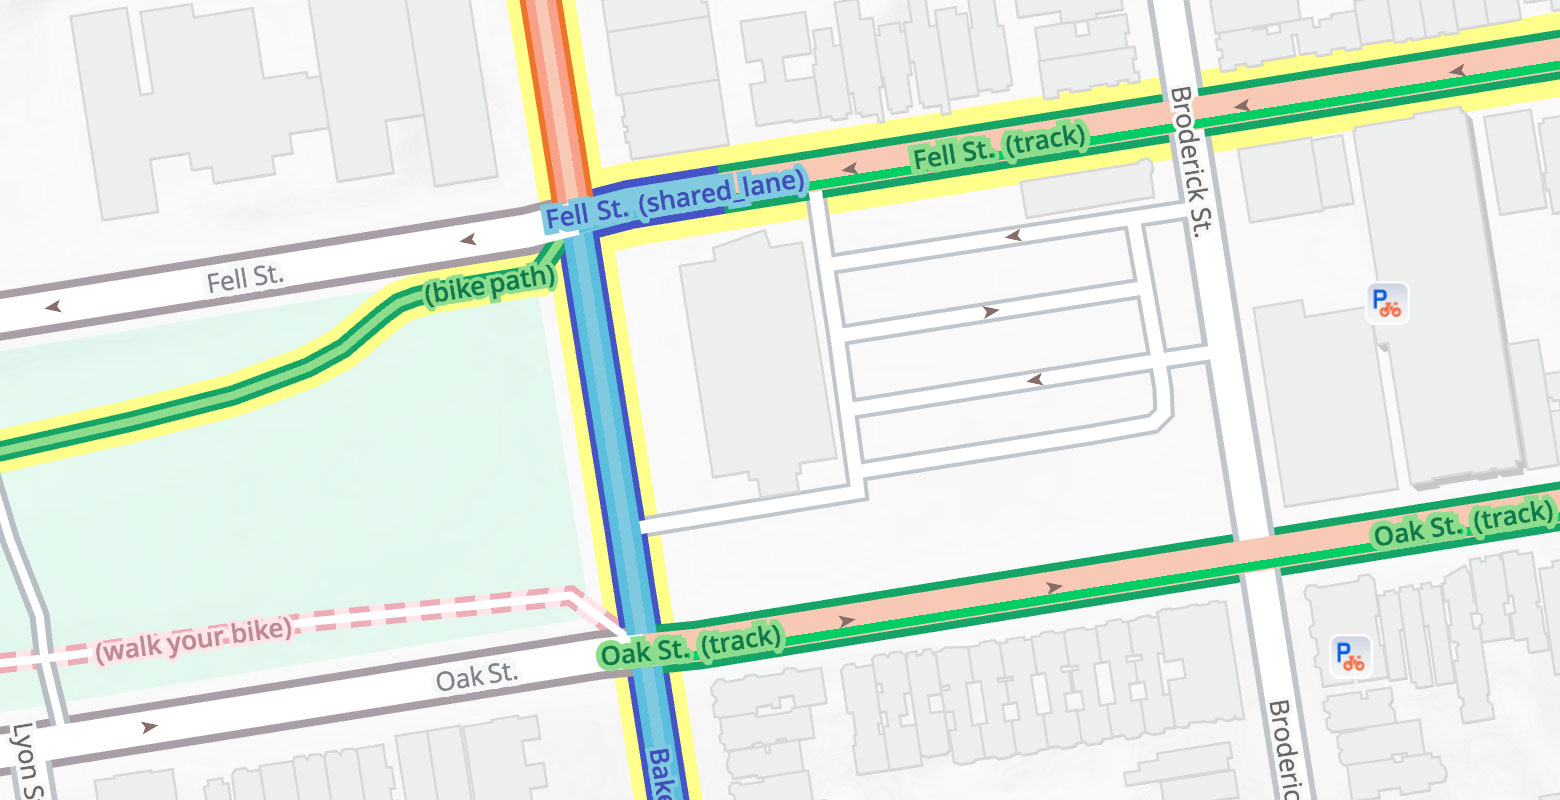
Bike labels are displayed starting at zoom level 18, along with right and left colored casings that indicate where to ride your bike.
Wondering what “green” means? Zoom into 18 and see that some are paths and some are cycle tracks along Fell and Oak Streets. Wondering what “blue” means? Zoom in and see “shared lane” along Baker St.
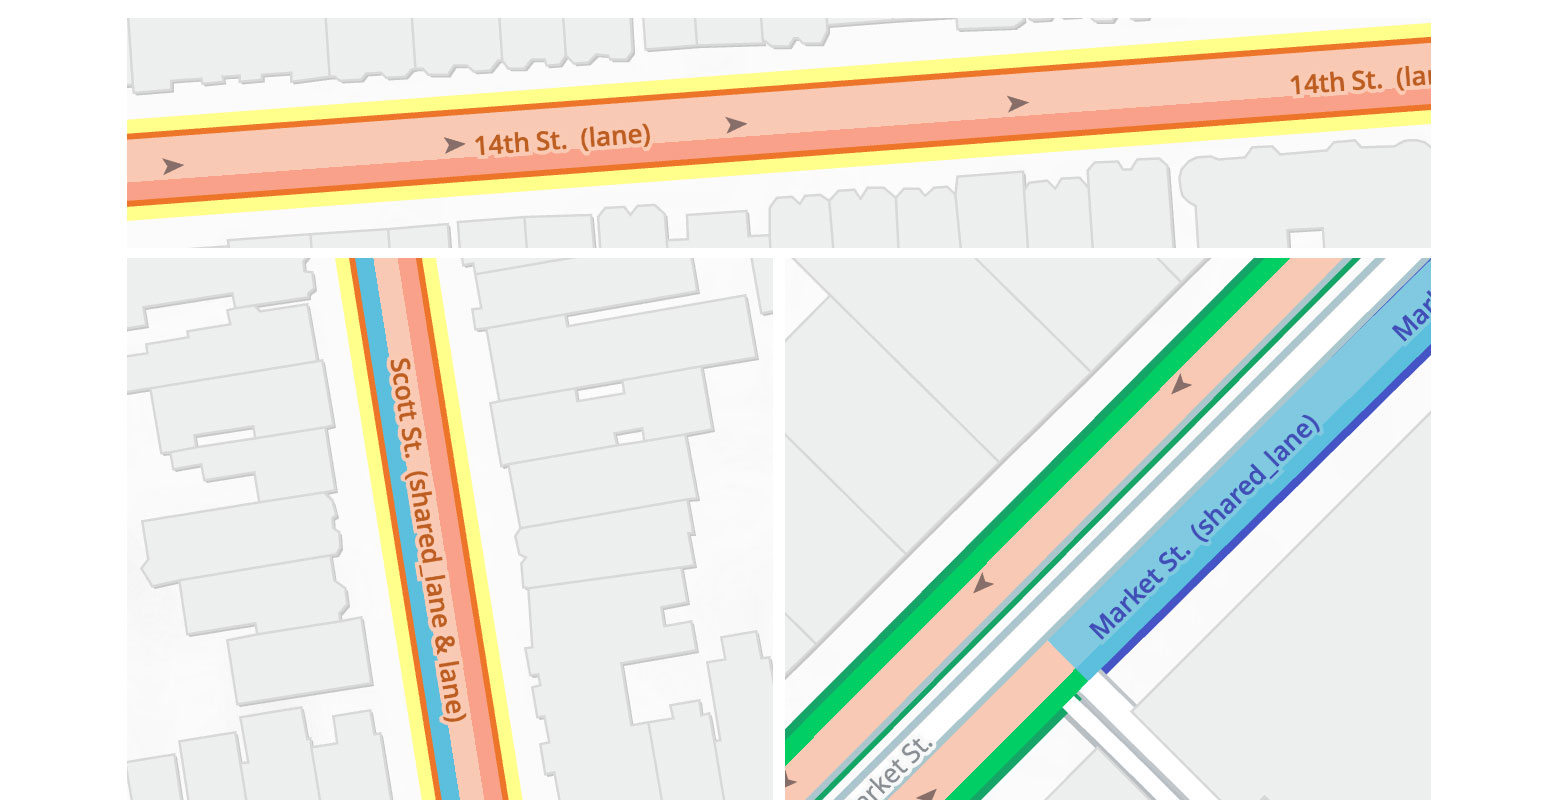
The “lane” label on 14th Street (below) indicates that there is a bike lane separated from car traffic, and orange inner line shows the lane is located on the right hand side of the road.
Sometimes things get complicated and different sides of the road have different types of bicycle facilities. Scott St. (below) has a “orange” bike lane going north but only a “blue” shared lane going south.
Special thanks to Patricio Gonzalez Vivo and Brett Camper for shader help! See how to create this special left and right casing in Tangram:
casing_both:
    base: lines
    texcoords: true
    shaders:
        uniforms:
            OFFSET: 0.7
            blocks:
                color: |
                    vec2 st = v_texcoord.xy;
                    if (st.x < OFFSET && 1. - st.x < OFFSET) {
                        discard;
                    }
casing_left:
    mix: casing_right
    shaders:
        uniforms:
            FLIP: true
casing_right:
    base: lines
    texcoords: true
    shaders:
        uniforms:
            FLIP: false
            OFFSET: 0.7
        blocks:
            color: |
                vec2 st = v_texcoord.xy;
                if (FLIP) {
                    st.x = 1. - st.x;
                }

                if (st.x < OFFSET) {
                    discard;
                }
Bike Icons
The bike overlay enables a special icon treatment for places related to bicycling, including: bicycle parking, bicycle rentals, bicycle repair stations, bicycle shops, drinking water, toilets, cafes, and pubs.

![]()
New York and Copenhagen bike icons
We’ve also added bicycle junctions (for cycle node networks common in Europe) and cycle barriers.
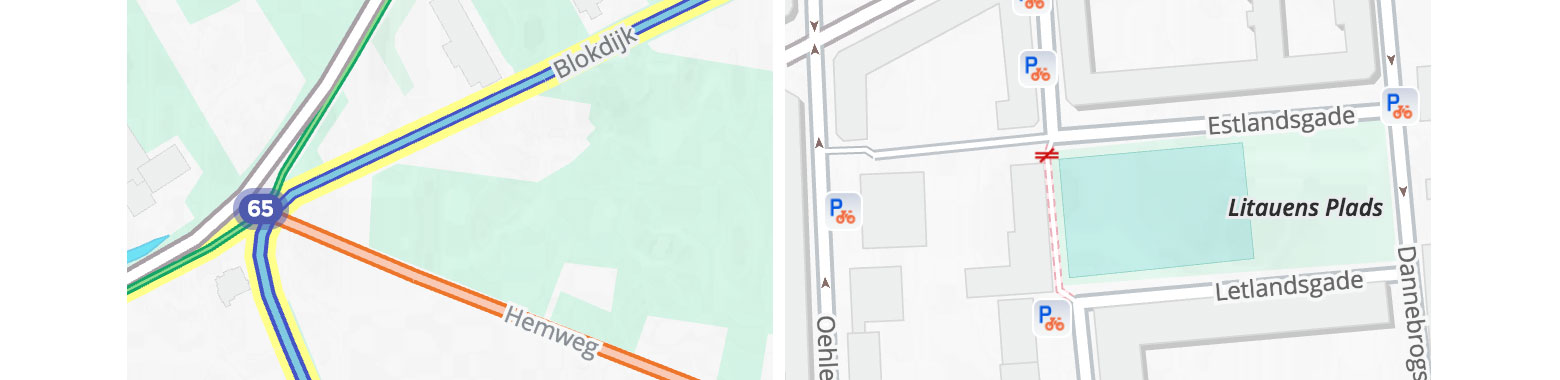
Bicycle junction in the Netherlands and cycle barriers in Copenhagen
Walkabout Improvements
Roads Redesign
Before adding the new bike overlay, we reworked the way the roads are drawn in Walkabout. These changes have made a huge improvement on the overall color of the map and helps provide greater legibility.
The first improvement was on road colors and transitions. Before, with the use of the pencil spheremap and thin gray lines for roads, there was a tendency for the overall color of the map to feel “dirty” gray.
Our solution is to open up highways, primary and secondary roads at lower zoom levels and start minor roads as white instead of gray when they first appear at zoom 12. See Paris at zoom level 13 before and after comparison below.

Here’s a comparison view of New York at zoom level 12.
All the road changes were in anticipation of the special way we’ve integrated the bike overlay in the yaml. Instead of adding the bike information on top of the basemap, we’ve weaved the various bike categories into the roads structure itself.
There is no second “overlay” layer drawn on top. Since we know from the vector tiles if a road is bike related, we can modify the appearance of the road as it’s drawn the first time. This way, it keeps its width, but adjusts the color according to the tiers described above (and adds the inner line casings as appropriate). Nathaniel and I started calling this the “bike interlay”, but the SDK continues the overlay pattern from transit.
New Green Sphere Map
We now have an additional sphere map for green areas. In the initial version of Walkabout, color was added on top of gray. This also increased the tendency for the “dirty” gray overall color of the map.
With the addition of the new sphere map, we’re now mixing various shades of greens for all green areas. Along with this and other shader adjustments, the greens are more pure and there is more definition on the shading of terrain.

See a comparison view of Kyoto before and after below.
Walkabout: Now Trails Optional
We’ve also upgraded the paths and trails along with the new roads. Paths and trails are now an optional overlay that can be turned on and off as well. See Golden Gate Park below with and without the path overlay. This makes Walkabout suitable for a wider range of (not walking) applications.
One-Way Arrows
Walkabout roads now include one-way arrows. Arrows start at zoom level 17 and are important for bicycling with the direction of car traffic (or in rare cases opposite for contraflow cycle lanes).
Gallery
See how bike-friendly your city is! Below are some zoom level 12 views of various cities. Notice all the green in Copenhagen, considered number one bike capital of the world.
Zoom 12 Bike map views for San Francisco, New York, Copenhagen, London, Berlin and Portland
Here are some more views of bike-friendly cities:
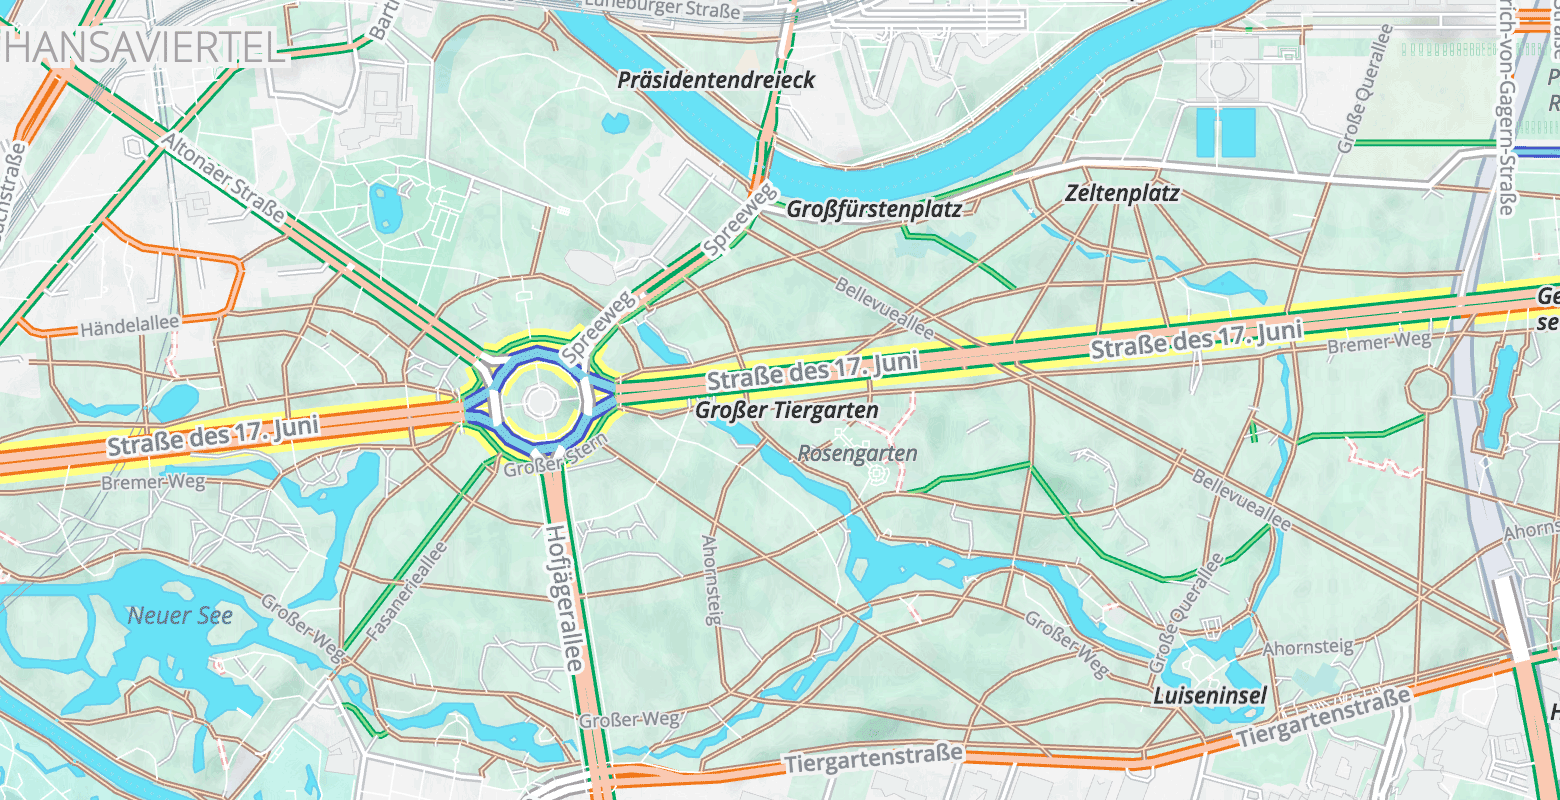
Berlin
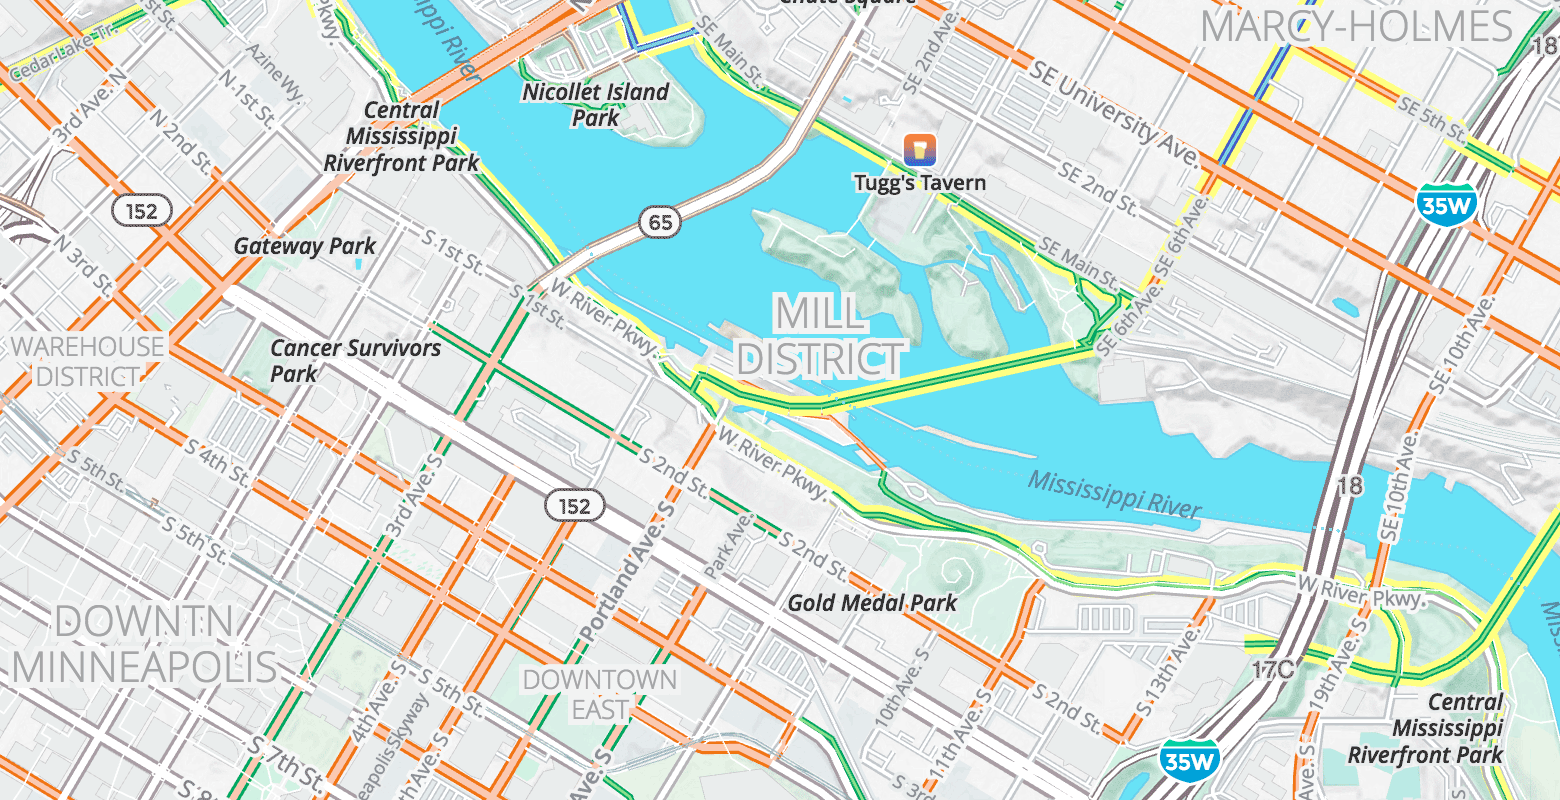
Minneapolis

Strasbourg
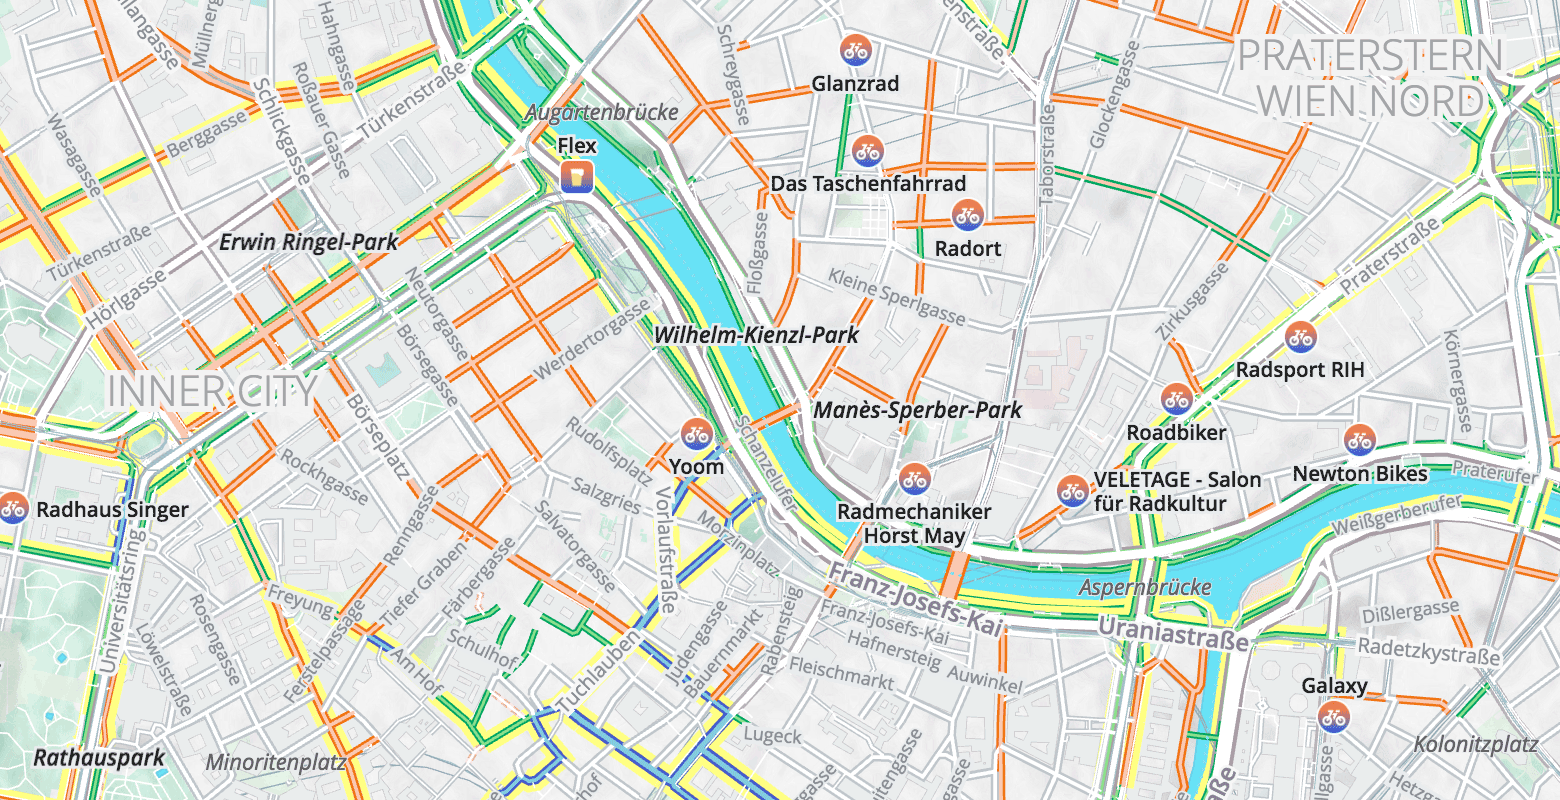
Vienna
Powered by Mapzen Vector Tiles
Thanks to Matt Amos and Rob Marianski, Mapzen Vector Tiles include bicycle properties on road features directly, including data traversed from OpenStreetMap relations to highlight national and regional cycle networks.
Are you curious how to tag roads in your city on OpenStreetMap so they show up on Walkabout’s bike overlay? Check out our Cycleways Targeted Editing blog post. Changes made in OpenStreetMap will show up in a few hours in Mapzen Vector Tiles.
This new version of Walkabout is the first to require a Mapzen API key to enable access to Mapzen vector tiles. Read more about the change in our earlier post, and get a free API key here.
Besides updating the map, changes in OpenStreetMap will also update Mapzen Turn-by-Turn directions to improve our elevation influenced bicycle routing.
Get the Bike Overlay
Just like enabling languages, it’s very easy to turn on the bike overlay after importing the Walkabout basemap style in Tangram – just import the basemap and add a few lines! The Cartography docs include the following example and bonus map legend.
Set the required Mapzen API key to access vector and terrain tiles, disable the path overlay (which is on by default), and enable the optional bike overlay:
import: https://mapzen.com/carto/walkabout-style/4/walkabout-style.zip

global:
  sdk_mapzen_api_key: mapzen-xxxxxx          # your API key here
  sdk_path_overlay: false
  sdk_bike_overlay: true
If you’re using mapzen.js:
var map = L.Mapzen.map('map', {
  center: [40.8041, -124.1506],
  zoom: 15,
  maxZoom: 20,
  tangramOptions: {
    scene: {
      import: L.Mapzen.BasemapStyles.Walkabout,
      global: {
        sdk_mapzen_api_key: 'mapzen-xxxxxx',  // your API key here
        sdk_path_overlay: false,
        sdk_bike_overlay: true
      }
    }
  }
});
Let us know what you think. We are working on a colorblind-safe mode and would like your feedback.
Also, it turns out that people have… opinions about map colors. Our choices are admittedly qualitative, but we wanted a “warm” set of colors that would let cyclists readily see safer routes and would work well with the Walkabout palette.
The good news it that if you are so opinionated, you are not stuck with our colors as you would be with raster tiles! The magic of vector tiles and Tangram lets you readily change colors on the fly via global variables – try it in Tangram Play!
Just uncomment (command-slash in Tangram Play!) the bike tier you want to change, using hex, rgb, hsl or even human-friendly HTML/CSS color names.
_coloris the casing/outline._color_casingis for bike lanes on the left and right side of the road at zoom 18._color_liteis the interior of the road.
import: https://mapzen.com/carto/walkabout-style/4/walkabout-style.zip

global:
    sdk_mapzen_api_key: mapzen-xxxxxx          # your API key here
    sdk_path_overlay: false
    sdk_bike_overlay: true
    # bike_tier1_off_road_path_color: [0.085,0.650,0.405] # green casing / outline
    # bike_tier1_off_road_path_color_casing: [0.000,0.810,0.392] # green left-right lanes at z18
    # bike_tier1_off_road_path_color_lite: # [0.554,0.865,0.554] # green fill
    # bike_tier1_off_road_footway_color: [0.690,0.547,0.504]  # light brown tracks (unpaved)
    # bike_tier1_off_road_footway_color_lite: [1.000,0.881,0.770] # lighter brown tracks (unpaved)
    # bike_tier1_off_road_track_color: [0.500,0.343,0.290]  # brown casing / outline
    # bike_tier1_off_road_track_color_lite: [0.917,0.759,0.610] # brown fill
    # bike_tier1a_label: [0.063,0.474,0.294] #green label
    # bike_tier1b_label: [0.559,0.338,0.269] #brown label
    # bike_tier2_on_road_protected_color: [0.930,0.460,0.167] # orange casing
    # bike_tier2_on_road_protected_color_casing: [0.980,0.635,0.545] # orange left-right lanes
    # bike_tier2_on_road_protected_color_lite: [0.980,0.792,0.706] # orange fill
    # bike_tier2_label: [0.743,0.367,0.135] # orange label
    # bike_tier3_on_road_not_protected_color: [0.273,0.332,0.780] #[0.361,0.416,0.800] # blue casing
    # bike_tier3_on_road_not_protected_color_casing: [0.357,0.750,0.870] # blue left-right lanes
    # bike_tier3_on_road_not_protected_color_lite: [0.502,0.792,0.880] #[0.660,0.829,0.880] # blue fill
    # bike_tier3_label: [0.253,0.307,0.719] # blue label
    # bike_prohibited_color: [0.930,0.679,0.721] # pink dashed line (no bikes/walk your bike)
    # bike_prohibited_color_lite: [1.000,1.000,1.000] # pink fill
    # # regional_network_highlight: [0.973,1.000,0.318] # yellow highlight
    # regional_network_highlight: [1.000,1.000,0.549] # yellow hightlight
    # no_bike_label: [0.740,0.540,0.572] # pink casing
    # no_bike_color_lite: [1.000,0.898,0.918] # pink fill
(Make sure you add your API key on line 4 to see your changes or your map will be sad. Also, the /4/ in the import url is important – we may change these color variable names in the future.)
Safe biking!

