Hello!
Welcome to another Make Your Own [ ].
Today I’m going to take a break from Tangram cartography to talk about another feature of mapzen.js: the geocoder!
Or, yeah, you can call it the search box. 🙂
The mapzen.js geocoder is built on Mapzen Search, a geocoding and place-finding service.
We built the geocoder with sane defaults, so that it will work for your map straight out-of-the-box. However, there are times when you might want to change the look and interaction of the search box, or even tweak the search query itself.
To show you some of the customizations that we can make to the geocoder, I’m going to walk through two different examples.
Let’s start with a quick campus map.
Campus Map
Open up your favorite text editor and create an index.html file we can view in our browser:
<!DOCTYPE html>
<html lang="en">
  <head>
    <title>Campus Map | The mapzen.js geocoder</title>
    <meta charset="utf-8">
    <link rel="stylesheet" href="https://www.nextzen.org/js/nextzen.css">
    <script src="https://www.nextzen.org/js/nextzen.min.js"></script>
    <style>
      html,body{margin: 0; padding: 0}
      #map {
        height: 100%;
        width: 100%;
        position: absolute;
      }
  </style>
  </head>
<body>
  <div id="map"></div>

  <script>
    // Mapzen API key (replace key with your own)
    // To generate your own key, go to https://mapzen.com/developers/
    L.Mapzen.apiKey = 'mapzen-JA21Wes';

    var umn = [44.9745, -93.2346];
    var southWest = L.latLng(44.96289, -93.24696),
        northEast = L.latLng(44.99170, -93.16660),
        umnBounds = L.latLngBounds(southWest, northEast);

    var map = L.Mapzen.map('map', {
      center: umn,
      zoom: 16,
      tangramOptions: {
        scene: L.Mapzen.BasemapStyles.CinnabarMoreLabels
      }
    });

    // Instantiate the geocoder (a.k.a the search box)
    var geocoder = L.Mapzen.geocoder();

    // Add geocoder to map
    geocoder.addTo(map);

  </script>
</body>
</html>
Need help getting started? Check out our guide to setting up a bare bones development environment.
API Key
The first thing you may have noticed is the need for an API key. The API key is a code that identifies your Mapzen developer account without you needing to provide a password. Handy!
The API key isn’t unique to just the geocoder. All of Mapzen’s hosted services are shared resources, so we require an API key to prevent individual users from degrading system performance for everyone.
See the full list of Mapzen services and rate limits.
To make API key juggling a little easier, mapzen.js allows you to set a single global key that will be used for all Mapzen services:
L.Mapzen.apiKey = 'mapzen-JA21Wes';
And don’t worry–sharing the same API key between different services will not affect individual rate limits. They don’t share limits.
The API key we’re using here ('mapzen-JA21Wes') is used by many of our demos. It’s fine to use it while working through these examples, but keep in mind that rate limits will be shared by everyone using that same key. So, if you find that tiles aren’t loading properly, then it’s probably time to snag your own. (Also, we’ll be rotating this demo key every few months, so don’t get too attached to it…)
Sign up for a free API key at https://mapzen.com/developers.
And before you ask… Yes! Mapzen offers a generous free tier, which should be plenty for small projects. If it’s not, and you find yourself bumping up against rate limits, just let us know.
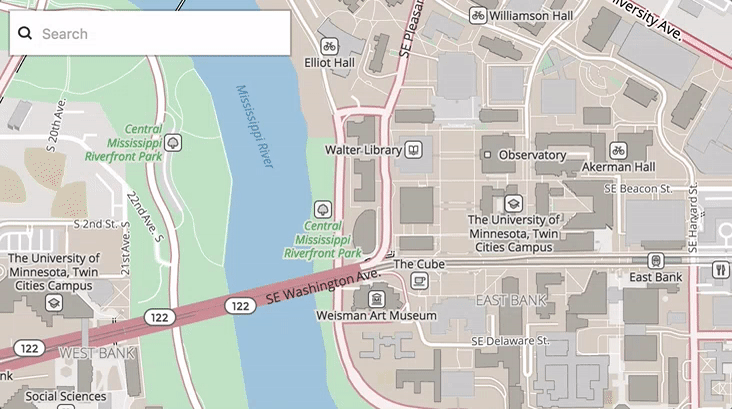
Ok. Back to our campus map.
So far we have a simple map zoomed in on the University of Minnesota Twin Cities (go Gophers!), along with the default search box.
Go ahead and give it a spin.
If we start typing in “burrito”, you’ll see that we immediately get a list of possible search results:

Gonna find me a burrito
Some of these are relevant… Burrito Loco is certainly nearby. And despite El Burrito Mercado being all the way over in St. Paul, I am a fan so I’ll let it slide.
Wait, Holmen, WI? Where?
AMES, IOWA?!
Ok, clearly this is not the most relevant list of locations for our late-night burrito run.
Not to worry, we can fix this. There are few burrito problems that Mapzen can’t solve.
Let’s try filtering our results.
Filtering results
By default, the geocoder prioritizes results found near the center of our current map view. If you want, you can turn this off by setting focus: false. Of course, we don’t want to do that in this example. In fact, we’d like to go one step further and limit our results to a defined bounding box.
We already have a bounding box defined in our initial index.html file called umnBounds. Let’s use that bounding box to set the bounds option on our geocoder:
    // Define geocoder options
    var geocoderOptions = {
      bounds: umnBounds
    };

    // Instantiate the geocoder (a.k.a the search box)
    var geocoder = L.Mapzen.geocoder(geocoderOptions);
Now, when we run our same burrito search…

Gonna find me a nearby burrito
Ok. I’ll admit. It’s sad that only one burrito place is showing up. But also… it’s Minnesota. Perhaps I should have expected that.
In happier news, our bounded search works!
Excellent!
Next, I want to look up one of my favorite buildings on campus (and my home away from home back in the twenty-oughts): Pillsbury Hall.
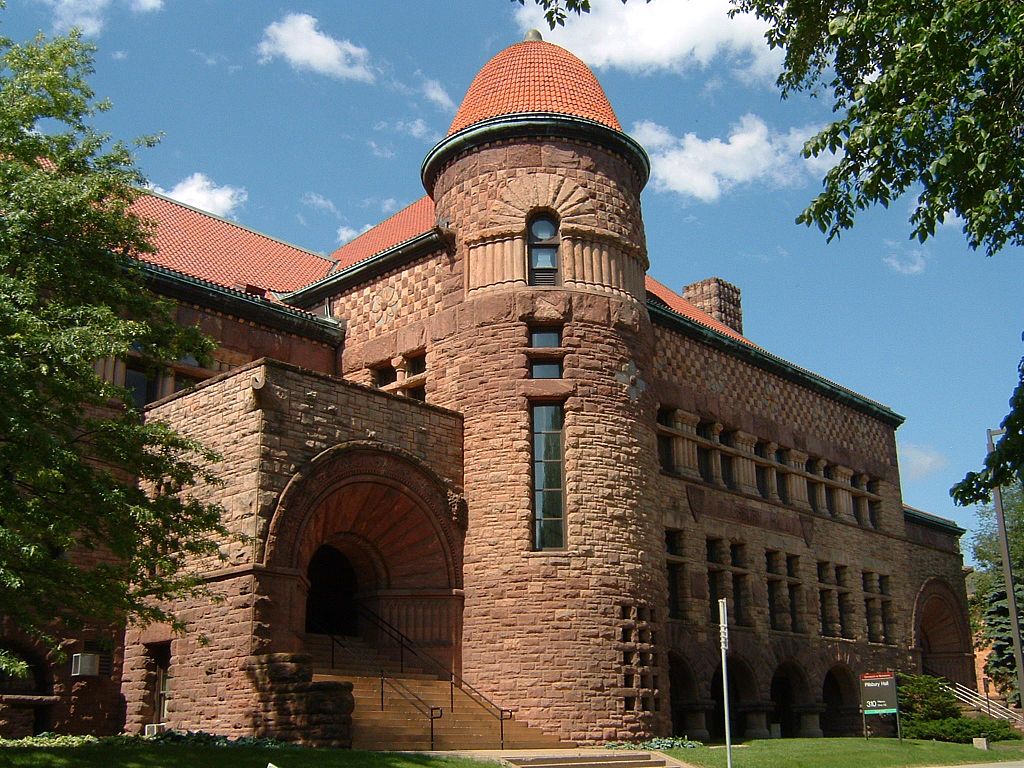
Pillsbury Hall, the second oldest building on the Twin Cities campus. Home to rock samples, stressed-out grad students, and the occasional mouse.
Let’s start typing…

Huh. Well, it found the building. But there are also a lot of addresses that came up. That’s not so helpful. Let’s filter those out using the layers option.
The layers option limits the type of places the geocoder will search. This will allow you to focus on everything from fine-resolution geocoding (like venues and addresses) to coarse geocoding (neighborhoods, counties, and even countries).
See the full list of place types available to search.
Let’s limit our search results to just “venues”:
    var geocoderOptions = {
      bounds: umnBounds,
      layers: ['venue']
    };
Now, when we search for “Pillsbury Hall”, our search results no longer include addresses.

Splendid.
Custom markers
Before we wrap up this example, let’s make one more customization to our map: custom markers.
You may have noticed that many of our search results come with a default Leaflet marker. This marker appears when the result has been highlighted (using the arrow keys on your keyboard) or selected from the dropdown list.
For example:
We can change that icon by using the markers option. The markers option will accept a boolean (false will hide the markers all together) or a set of Leaflet marker options, including a custom L.icon.
Let’s set up a custom icon and add that to our geocoder options:
    // Create custom icon
    var myIcon = L.icon({
        iconUrl:  'mn_icon.png',
        iconSize: [40, 40],
        popupAnchor: [0, -20]
    });
    var markerOptions = {
      icon: myIcon
    };

    // Define geocoder options
    var geocoderOptions = {
      bounds: umnBounds,
      layers: ['venue'],
      markers: markerOptions
    };

Ok, so maybe my icons are a little on the nose. 😉
Here’s a look at our final campus map:
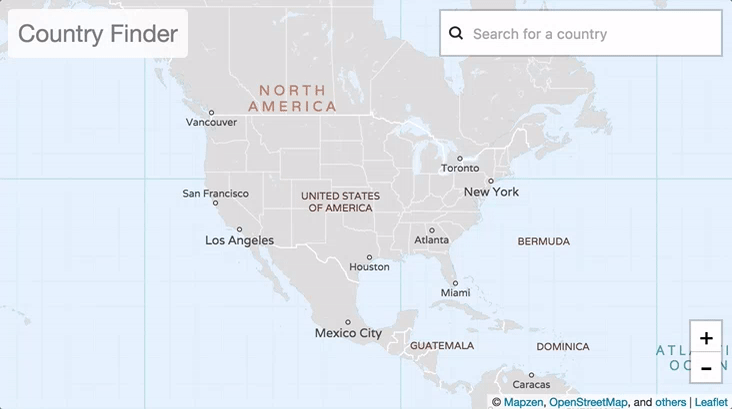
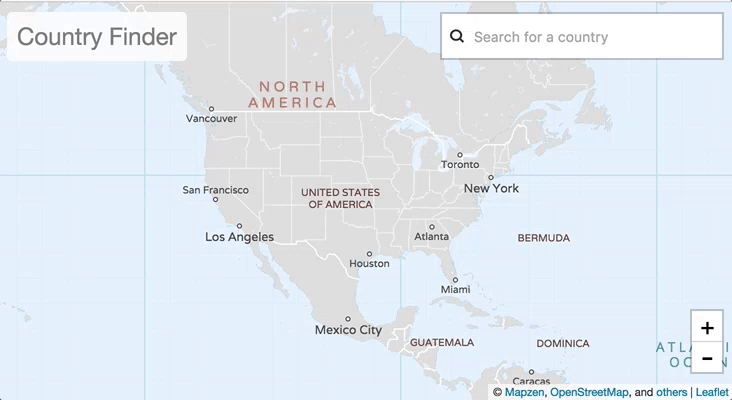
Country Finder
In the previous example, we focused on a very small area with fine-grained geocoding. For this next example, we’ll go in the completely opposite direction. We are going to make an app that searches country names only.
Here’s the code to get started with:
<!DOCTYPE html>
<html lang="en">
  <head>
    <title>Country Finder | The mapzen.js geocoder</title>
    <meta charset="utf-8">
    <link rel="stylesheet" href="https://www.nextzen.org/js/nextzen.css">
    <script src="https://www.nextzen.org/js/nextzen.min.js"></script>
    <style>
      html,body{margin: 0; padding: 0}
      #map {
        height: 100%;
        width: 100%;
        position: absolute;
      }
      #title {
        position: absolute;
        z-index: 1000;
        background: rgba(255, 255, 255, 0.85);
        border-radius: 5px;
        margin: 10px;
      }
      #country_name {
        color: red;
        font-family: "Helvetica Neue", Helvetica, sans-serif;
        font-weight: normal;
        margin: 10px;
      }
      #initial_text {
        color: gray;
      }
  </style>
  </head>
<body>
  <div id="map"></div>
  <div id="title">
    <h2 id="country_name"><div id="initial_text">Country Finder</div></h2>
  </div>

  <script>
    // Mapzen API key (replace key with your own)
    // To generate your own key, go to https://mapzen.com/developers/
    L.Mapzen.apiKey = 'mapzen-JA21Wes';

    var map = L.Mapzen.map('map', {
      center: [37.632, -96.108],
      zoom: 3
    });

    // Define geocoder options
    var geocoderOptions = {
      position: 'topright',
      layers: ['country'],
      placeholder: 'Search for a country',
    };

    // Instantiate the geocoder (a.k.a the search box)
    var geocoder = L.Mapzen.geocoder(geocoderOptions);

    // Add geocoder to map
    geocoder.addTo(map);

    // Add results listener

  </script>
</body>
</html>
This time, we’re starting you off with a few geocoderOptions already defined.
We’ve added a title to the top left corner of the map, so we moved the geocoder to the 'topright' of the map. The geocoder (like most Leaflet controls) will take any of Leaflet’s control positions via the position option.
We’ve also limited the types of places we can search for (using the layers option) to simply 'country'. The geocoder won’t return results for any other types. (Again, here’s that full list of available place types.)
Lastly, we’ve updated the placeholder text (that’s the text inside of the search box) from the default “Search” to “Search for a country”. This should help our users understand that the geocoder will only be returning country results.
So, even from the start, our map mostly does what we want. You can search for countries and they’ll be returned. But there are a few things we can improve upon.
For example, try searching for “Brazil”.

You’ll notice that two results pop up.
If we look at the network request, it appears that the two results are coming from two different sources: whosonfirst and geonames
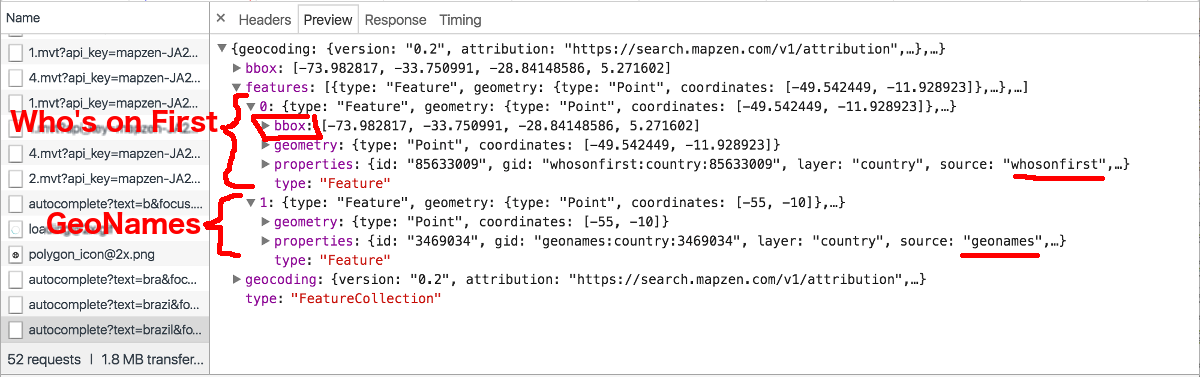
The network tab on Chrome DevTools.
Sources
Currently, the geocoder searches data from OpenStreetMap, OpenAddresses, Who’s on First, and GeoNames. Not all sources return the same data (read more about data sources in Mapzen Search).
In this case, both Who’s On First and GeoNames return a (slightly different) result for “Brazil”. While Who’s on First returns a bounding box for the entire country, the GeoNames result includes information on just the centroid (center-most point) of the country. For our purposes, we will want information about the geography of the entire country–namely, the bounding box.
So, let’s limit our data sources to return data just from Who’s On First.
We can do this by using the params option. The params option will serialize and pass along any available parameters in Mapzen Search, including sources.
To limit the sources our geocoder will check, add the following to geocoderOptions:
    // Define geocoder options
    var geocoderOptions = {
      position: 'topright',
      layers: ['country'],
      placeholder: 'Search for a country',
      params: {
        sources: ['wof']
      },
    };
(By the way, 'wof' stands for Who’s On First.)
When we try searching again for “Brazil”, we’ll see that only one search result is returned.
Progress! Now let’s do something with that bounding box.
My goal is to highlight the selected country by drawing and zooming to the country’s bounding box. We could grab the bounding box from the autocomplete response we just looked at. But autocomplete often returns several results (not to mention, it fires on each keystroke). I’d rather wait until the country has been selected from the list, so we know exactly which country to highlight.
We can do this by leveraging…
The Place Endpoint
Let’s jump right in and see this in action. Go ahead and add an option to our geocoderOptions called place:
    var geocoderOptions = {
      position: 'topright',
      layers: ['country'],
      placeholder: 'Search for a country',
      params: {
        sources: ['wof']
      },
      place: true,
    };
By setting this option to true, the geocoder will make a request to the place endpoint each time a search result is selected. If we set up an event listener for this request, we can then do something with the result.
Let’s add a results listener to the bottom of the JavaScript section:
    // Add results listener
    geocoder.on('results', function(e) {
      // requestType may be 'autocomplete', 'search', or 'place'
      if (e.requestType === 'place'){

        // Update country name in title
        var name = e.results.features[0].properties.label;
        document.getElementById('country_name').innerHTML = name;
      }

    });
So far, all we’re doing is checking the requestType (we don’t want this running on every autocomplete response!), updating the country name in our title box, and grabbing the bounding box from the response.
Next, let’s grab the bounding box and convert it into a Leaflet latlngBounds object. We’ll need this object to highlight and zoom to our selected country.
    // Add results listener
    geocoder.on('results', function(e) {
      // requestType may be 'autocomplete', 'search', or 'place'
      if (e.requestType === 'place'){

        // Update country name in title
        var name = e.results.features[0].properties.label;
        document.getElementById('country_name').innerHTML = name;

        // Get bounding box of result
        var bbox = e.results.bbox;
        var bounds = [
          [ bbox[1], bbox[0] ],
          [ bbox[3], bbox[2] ]
        ];

      }
    });
To avoid leaving behind a rectangle for each country we’ve searched, let’s create a single Leaflet Rectangle object then simply update the bounds of the rectangle each time we select a country.
Somewhere near the top of your JavaScript block, set up the initial L.Rectangle object:
    // Set up bounding box for highlighting
    var bboxHighlighter = L.rectangle([[180, 90], [180, 90]], {color: 'red', weight: 3, fillOpacity: 0}).addTo(map);
We’ll set the rectangle coordinates to a location outside of our initial map view.
Back in our results listener, we’ll update the L.Rectangle bounds and zoom to the selected country:
    // Add results listener
    geocoder.on('results', function(e) {
      // requestType may be 'autocomplete', 'search', or 'place'
      if (e.requestType === 'place'){

        // Update country name in title
        var name = e.results.features[0].properties.label;
        document.getElementById('country_name').innerHTML = name;

        // Get bounding box of result
        var bbox = e.results.bbox;
        var bounds = [
          [ bbox[1], bbox[0] ],
          [ bbox[3], bbox[2] ]
        ];

        // Update bounds of bounding box
        bboxHighlighter.setBounds(bounds);

        // Zoom to bounding box
        map.fitBounds(bounds);
      }
    });
Much better.
Let’s make two last changes to our Country Finder, just to clean it up a bit.
In our campus map, we added custom markers to the map to show search result locations. For this example, let’s turn off markers altogether by setting the markers option to false.
While we’re at it, let’s also disable the panToPoint feature. This option instructs the map to zoom/pan to a search result as you highlight it in the dropdown list.
    var geocoderOptions = {
      position: 'topright',
      layers: ['country'],
      placeholder: 'Search for a country',
      params: {
        sources: ['wof']
      },
      place: true,
      markers: false,
      panToPoint: false
    };
And we’re done!
Phew. Is it just me or are these Make Your Own posts getting longer? #SorryNotSorry
The full code for these demos can be seen here: Campus Map and Country Finder.
If you have questions or want to show off something you’ve made with Mapzen, drop us a line. We love to hear from you!
Check out additional tutorials from the Make Your Own series:
- One Minute Map
- Map Sandwich
- Filters & Functions
- Put A Label On It
- Interactive Mapping with Tangram
- Lots of Dots
- Customize Your Search
Preview image of binocular telescope via Pexels (CC0)
